
How to Measure a Stand Up Pouch: A Beginner’s Guide to Packaging Measurements
New to packaging? This guide covers everything you need to know about stand-up pouch measurements: what the numbers mean, how to take them yourself, and how to avoid the sizing mistake that catches most first-time buyers off guard.
When you request a quote, suppliers typically respond with something like 6 × 9 × 3.5 inches. Three numbers, no further explanation. Most people assume that’s simply the size of the bag, and that any product smaller than those dimensions will fit. That assumption leads to a lot of wasted sample rounds, and this guide exists to save you from that.
The Three Dimensions of a Stand Up Pouch
Every stand-up pouch is described using three measurements, always in this order: Width × Height × Bottom Gusset. This is the standard format used across the packaging industry, so once you understand it, reading any supplier’s spec sheet becomes straightforward.
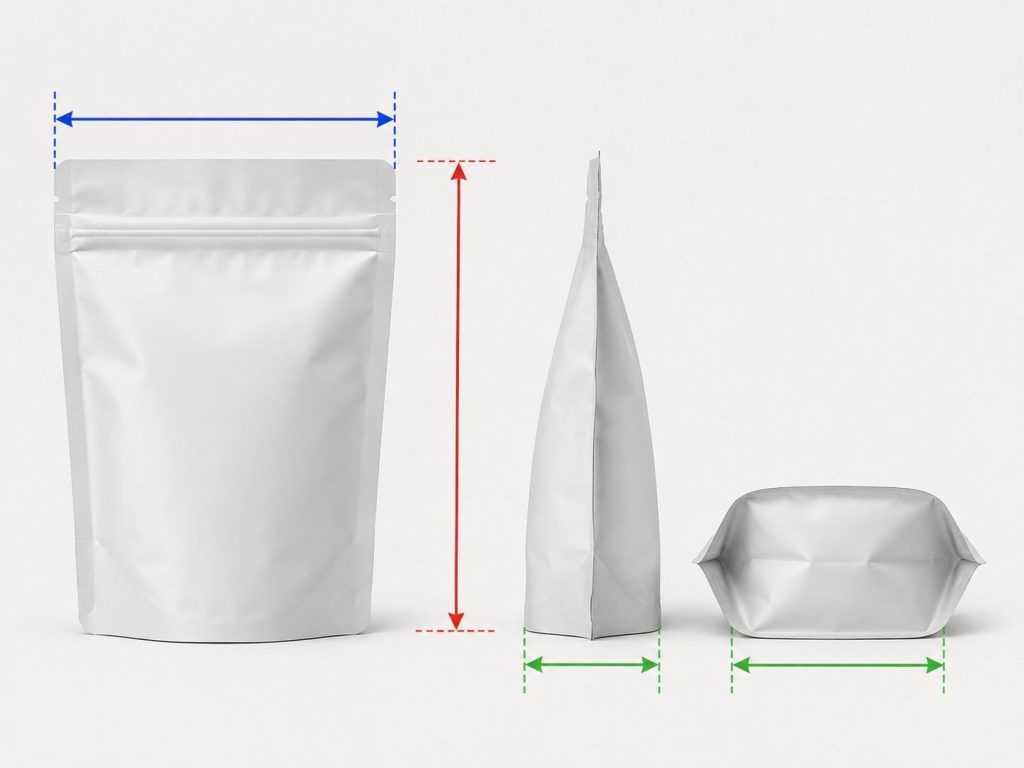
Width is the horizontal distance across the front of the pouch, measured from the left edge to the right edge when the bag is lying flat. Side seams are included in this measurement.
Height is the vertical distance from the very top of the pouch down to the bottom outer edge. The top seal is included. So if your pouch has a header or a hang hole at the top, that space is part of the height.
Bottom Gusset is where stand-up pouches differ from flat pouches. The gusset is the folded panel at the base that expands when the pouch is filled, allowing it to stand upright. To measure it, open the bottom of the pouch and measure from the outer edge to the deepest point of the inner fold, then double that number. One thing to watch for: some manufacturers list only half the gusset depth, while others list the full expanded width. Always confirm which convention your supplier is using before placing an order.
How to Measure a Stand Up Pouch Step by Step
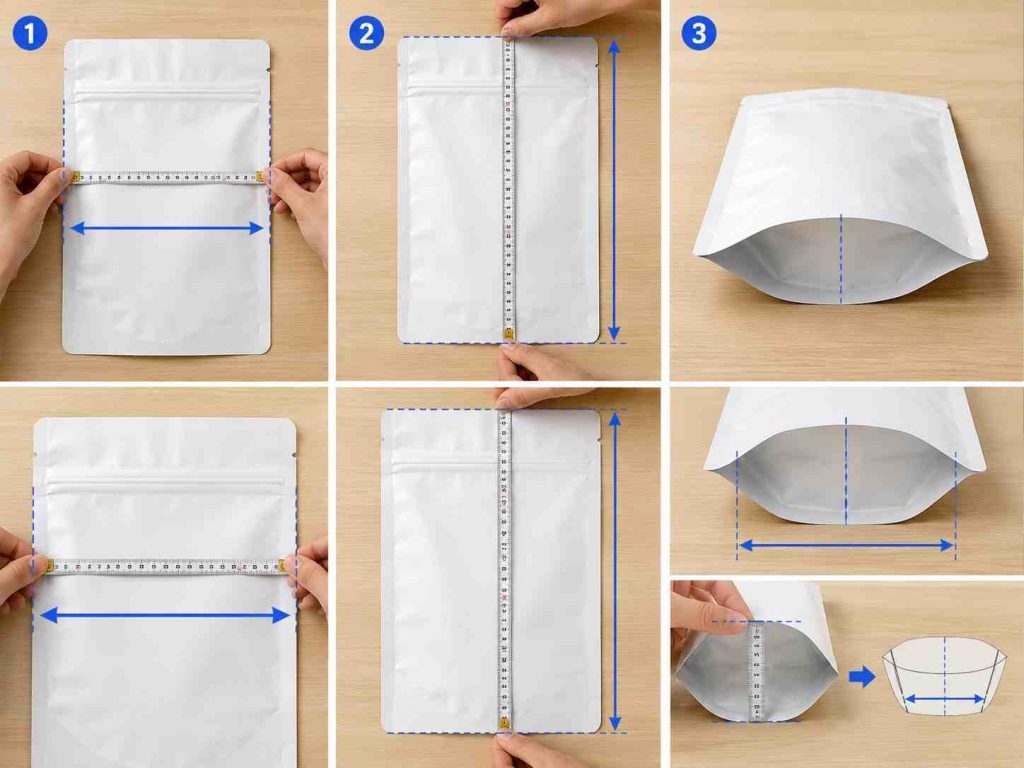
You don’t need any special equipment, a standard ruler or tape measure is fine. Lay the empty pouch flat on a table, making sure there are no wrinkles or folds pulling the shape out of alignment.
Step 1 — Width: Measure horizontally across the widest point of the pouch front, from left edge to right edge.
Step 2 — Height: Measure vertically from the top edge down to the bottom outer edge. Keep the tape straight along the side seam for the most accurate reading.
Step 3 — Bottom Gusset: Turn the pouch so you’re looking at the bottom. Open the fold gently and measure from the outer edge to the deepest fold point. Multiply by two to get the full gusset measurement.
One rule that applies to all three measurements: always measure from the outside. Stand-up pouch dimensions are based on external dimensions, not the interior space. This distinction matters more than most people realize, and it’s the source of most sizing mistakes which brings us to the next point.
Outside Dimensions ≠ Fillable Space
A pouch listed as 6 × 9 × 3.5 inches does not give you a 6 × 9 × 3.5-inch space to fill. The listed dimensions include every part of the pouch structure — seals, zipper, tear notch, hang hole — none of which holds product.
Here’s what actually reduces your usable space:
- Top seal: Typically 0.5–1 inch, depending on the pouch design
- Zipper closure: Usually sits 1–1.5 inches below the top edge, and everything above the zipper is dead space for filling purposes
- Bottom gusset seal: The very base of the gusset is sealed, so the full gusset depth isn’t all usable volume either
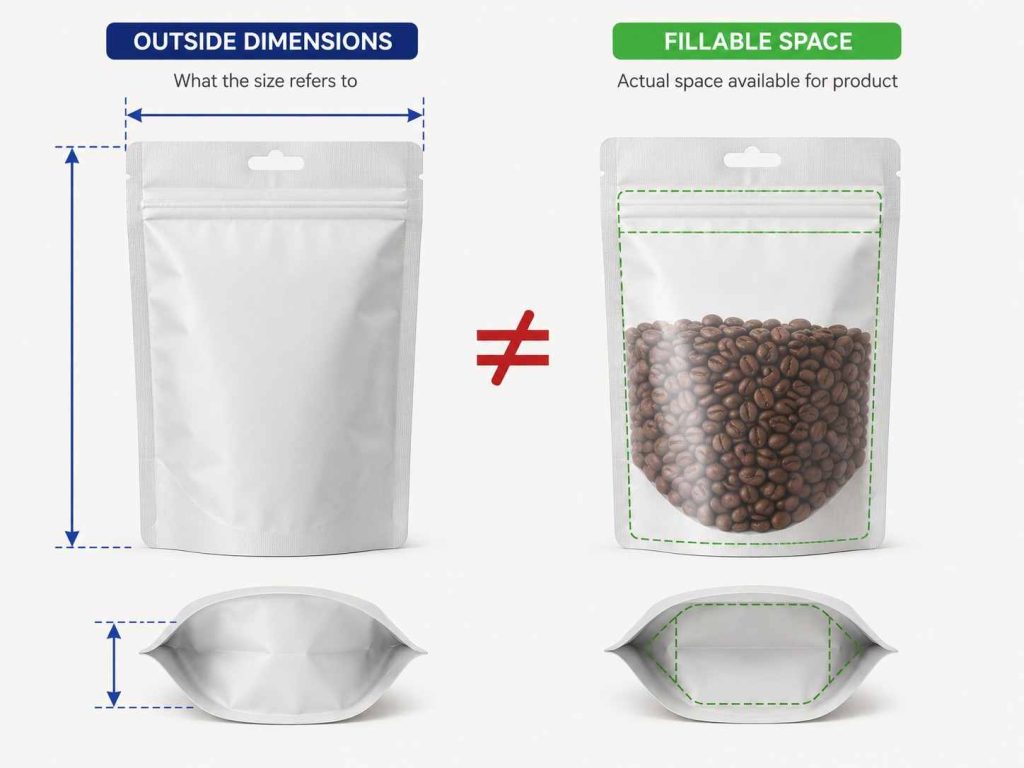
The fillable space is the area from just below the zipper (or top heat seal line, if there’s no zipper) down to the top of the bottom gusset seal. For a 6 × 9 × 3.5-inch pouch, the actual fillable height might be closer to 6.5–7 inches, not 9.
This is why packaging professionals always recommend testing with your actual product before committing to a production run. The math can get you close, but the fill test gets you accurate.
Common Stand Up Pouch Sizes
Once you understand how the dimensions work, a size reference table becomes much more useful. The weights below are approximate and vary based on product density — granola and coffee beans behave very differently even at the same weight.
| Size (W × H × BG) | Approx. Capacity | Common Applications |
| 4 × 6 × 2 in | ~2–3 oz / 60–85g | Sample sachets, spices, tea |
| 5 × 7.5 × 3 in | ~4–5 oz / 115–140g | Snack portions, small supplements |
| 6 × 9 × 3.5 in | ~8 oz / 227g | Coffee, protein powder, dried fruit |
| 8 × 12 × 4 in | ~1–2 lbs / 450–900g | Pet treats, nuts, larger snack bags |
| 10 × 14 × 5 in | ~4–5 lbs / 1.8–2.3kg | Bulk dry goods, animal feed |
These figures are starting points, not guarantees. A bulky product like puffed rice needs a larger pouch than its weight suggests, while a dense product like ground coffee packs tightly and may fit a smaller size than expected. When in doubt, go one size up and test.
More Reading: Types of Stand-Up Pouch Packaging: Styles, Structures, and Uses
Tips for Getting the Right Size When Ordering Custom Pouches
Measuring an existing pouch is one scenario. Ordering new custom pouches from scratch is another. In that case, your supplier needs specific information to recommend the right dimensions.
Provide your product’s dimensions in three directions. Width, depth, and height when the product is in its natural resting position. This gives the supplier the minimum internal space the pouch needs to accommodate.
Include the net weight and product type. Density matters. Saying “I need to pack 8 ounces” without specifying whether it’s coffee beans or fine spice powder leaves too much guesswork on the supplier’s side.
Mention your filling method. Hand-filling a pouch gives you flexibility; automated filling equipment has fixed funnel clearances and sealing bar widths that directly affect the pouch dimensions you can use. If you’re running an automated line, share the equipment specs with your supplier — this often requires adding 1–1.5 inches to the width compared to a manually filled equivalent.
Ask for samples before you commit. Fill them with your actual product, seal them, and check that the product sits correctly, the zipper closes cleanly, and there’s enough headspace for sealing, typically 1 to 1.5 inches between the top of the product and the seal line.
One More Thing Worth Knowing Before You Order
Two pouches can have identical external dimensions but very different internal volumes, simply because of differences in seal width, zipper type, or gusset construction. This is especially common when comparing pouches from different manufacturers, or when switching between a standard zipper and a child-resistant closure.
If you’re reordering from a new supplier after previously using another, don’t assume the same size specification will produce the same result. Measure a sample from the new source before approving the full run.
Getting the size right isn’t complicated, but it does require working through the right steps in order. Measure accurately, account for what you can’t fill, test with your actual product, and give your supplier complete information. That process takes a little more time upfront and saves a lot of back-and-forth later.
If you have a product in hand and want a size recommendation, contact the Shine Pack team with your product dimensions and weight. We can suggest a starting point and arrange samples for you to test before production begins.